Thursday, February 28, 2013

Clearing Storm

Last night's storm clouds were moving out of Manhattan just before sunset. Mottled light from the sun breaking through the clouds lit the Empire State Building so it stood out in contrast against the darkened sky.

Photo taken with the Fuji X-Pro1 and 18-55mm zoom set to 55mm (82mm equivalent).

Sunday, February 24, 2013

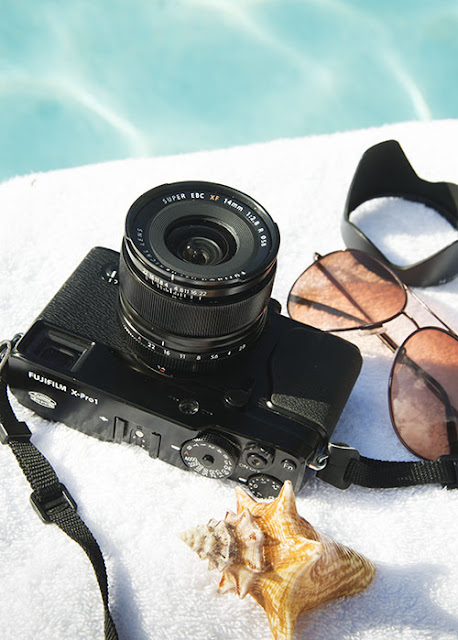
Fuji XF 14mm lens f/2.8 - hands on review


My personal favorite wide-angle focal length for travel and landscape photography with a full frame camera is 20 or 21mm.  This translates to 14mm on a camera with an APS sensor.  Needless to say, I was quite excited to try out the new Fujifilm XF 14mm f/2.8 ultra-wide lens to see how it would handle.  I was not disappointed. 

The achilles heal of many digital super wide lenses is loss of sharpness in the corners of the frame. In landscape photography in particular, I often move in close to foreground detail, which is where I put the main focus. The lens focuses super close up at 7.09" (18cm) allows you to really come in close for very dramatic effects.

Here I focused on the foreground shell, but with an aperture of f/16 almost everything is in focus.  I find that with many digital wide angle lenses the corners go soft.  In a photo like the one above, this would be very distracting.  Fortunately, the Fuji 14mm came through and kept the bottom corners of the sand in sharp focus.

 I performed my usual brick-wall test with this lens with surprisingly good results. At f/2.8 the corners were slightly soft, but not so much as to be annoying. At f/4 most of the softness went away, and by f/5.6 the image was sharp overall. All-in-all, I know of only a few lenses of similar that can out perform the results of the Fuji 14mm.

The Fuji X cameras have had auto and manual focusing issues, which the company has addressed in several firmware updates.  This lens has a novel feature that I found very convenient for switching to manual focus or manual over-ride of the auto focus. The front focus collar of the lens slides forward to lock the focus of the lens so it can not be moved by hand. Sliding the collar back reveals a focusing scale and allows the lens to be manually focused. The same procedure also allows over riding the auto focus system. This can be handy with a fast changing subject when you do not have time to adjust the focus points of the lens.  You can simply refocus the lens instead.

The top photo shows the focusing scale hidden by having the focusing collar moved forward to cover it up.  On the bottom the collar is pulled back and the focusing scale is exposed and accessible.
Both vignetting and linear distortion appear to be non-existent. None of the sample images shown here were corrected for vignetting of linear distortion.  I realize that both of these aberrations are easily corrected in post-processing, but it is nice to have a lens that does not need correcting. Having to correct for barrel or pin cushion distortion actually results in a slight reduction of the focal length of a lens because the image is being cropped as it makes the correction.

It was necessary to put a neutral density filter over the lens to achieve a shutter speed slow enough to blur the water fall on a sunny day.  The exposure was 2 seconds at f/22.
My preferred method for using an ultra-wide angle lens is to move in close on a foreground object where I then place the focus. At 14mm the depth of field is extensive, even when I used a fairly wide open f/4 aperture as in the above photo.  There is no vignetting and sharpness even into the corners.
Even on an overcast day, the lens resolved subtle color detail beautifully.


The close focus ability of the Fuji 14mm lens allowed me to move within inches of the foreground decoration and to keep the distant Empire State Building just peeking out from the right.
Conclusion:

I suppose the best thing I have to say about this lens is that I have nothing bad to say about it.  It focuses quickly, is fully corrected for the usual distortions, is convenient to use, focuses super close, has convenient manual focus over-ride, and has excellent resolution -- all features I would want in a focal length I use primarily for travel and landscape photography. The $900 price tag is well worth the delivered image quality from this lens. I would expect a similar quality level from a full frame lens of this focal range to cost at least twice as much.

Bottom line: Fuji got it all right when they designed this lens.  They appear to be listening to the users and making necessary design course corrections as they introduce new accessories for the X cameras.


Brilliant color, no distortion, and sharp as a tack in the corners.  What's there not to like!


Saturday, February 23, 2013

Working with high key light daylight

My goal for these model shots was to create a high-key image that was bright and airy.  I shot with strong back lighting from a window with some interior fill light from large reflectors, and kept the exposure very open. It takes a camera system with exceptional dynamic range and the ability to focus accurately in flat light situations to pull off images such as these.  This is where the latest Nikon pro cameras shine.  I used the Nikon D4 for both shots.

For this image I chose the Nikon 135mm Defocus lens set to an aperture of f/2.  The defocus Nikkors have the best soft focus bokeh effects of any lenses out there, yet retain excellent sharpness where they are focused.  I find them to be perfect for soft portrait effects, such as the one above.

Here I used the Nikon 50mm f/1.4 lens set to f/4.5 to add some depth of focus to the image.  I wanted to keep the model's foreground hand and the see-through white curtains in focus.  Keeping detail in those sheer, white curtains is where a camera with good dynamic range comes into play.

Friday, February 22, 2013

We had a model in the studio today so I took a photo of her listening to the sound of a shell, and then combined the photo in Photoshop with one of the sunset imagesI took in Jamaica.  We positioned a strong tungsten light behind the model to create a flare that would mimic the light from the sun.  Selecting a daylight color balance for the RAW image also allowed the warm color of the tungsten light to permeate the scene and blend better with the background.  The background was kept intentionally light to allow a designer to use the space for copy placement.

Thursday, February 21, 2013

Monday, February 18, 2013

Jamaica - "dis 'n dat"

Bob Marley land.
Ahh...Jamaican cuisine.

Whole new meaning to "tree house".

Sunday, February 17, 2013

Jamaica - flora and fauna


The red-billed swallow-tail hummingbird is the national bird of Jamaica. I photographed this one with a Nikon D800 and 70-200mm f/4 zoom.  The ISO was set to 640, which allowed me to set a shutter speed of 1/2000 second -- enough to freeze the bird's wings.

A green gecko
Right after photographing this conch shell at sunset I was swamped by a wave and dropped the Nikon D800 in the surf. I picked it up, toweled it off, and kept on shooting.  Nothing like a Nikon Pro body for durability.

Saturday, February 16, 2013

Jamaica at night


This night shot with stars was taken on a Fuji X-Pro1 and 14mm lens shot wide open at f/2.8. The exposure was 17 seconds at an ISO of 1600. I used a high ISO to keep the exposure time down because I find that 30 seconds is about the longest you can go before there is too much blurring in the stars as they move through the night sky.


Moonset over the ocean with a crescent moon.  The moon is much brighter than the rest of the scene so its exposuter washes out.  I took some exposures just for the moon and will substitute the coorect one when I return to my studio computer where I have better control than on the laptop I am using while I travel.

Friday, February 15, 2013

From Jamaica

Some random shots from my first day in Jamaica.


Thursday, February 14, 2013

Happy Valentine's Day!


Two heart shells photographed this morning on a beach in Jamaica with the Nikon D600, 24mm focal length on the Nikon 24-120mm lens set to f/20 for maximum depth of field.

Wednesday, February 13, 2013

I found these oil slicks on a wet sidewalk at the entrance to a parking garage and photographed them with the Sony RX100.  Setting the camera to square format, I took three photos with the intention of creating a triptych of prints later.

I liked the way the colors flowed from one to the other with a sidewalk break centered in the middle image.

This larger version of the center image of the triptych gives a clearer idea of the sidewalk detail.  The color was enhanced later in Photoshop by moving the images into the LAB color profile and working with them there.  Once the color work was completed, the images were finalized by converting them back to the Adobe RBG color profile. LAB is a much more extensive color profile allowing far greater range in the color palette.

Tuesday, February 12, 2013

Another composite image.  This time of a healthcare professional with a hospital environment.

Friday, February 8, 2013

We had a model in the studio today and photographed her as a dental hygienist seen from the perspective of the patient.  Later this image was composited with the photo from the blog post of a few days ago.  Because I shot each image specifically to be composited I was able to prepare them in a way that made the job of putting them together easier.  The hygienist, for instance, was photographed back lit by a studio tungsten lamp placed behind her to simulate the same type of lighting from the dental light. Also I photographed her from the same position I was in when I took the background shot, and used a similar lens focal length and depth of field.  As a result of this preparation, the two images blended together naturally, and the whole composite took only 20 minutes to complete.